
Winter | Spring | Summer | Fall | Holiday
Baskets | Community
Herbs and Baskets
baskets
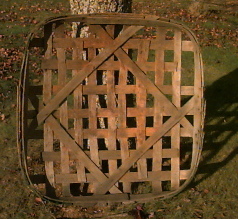
The true tobacco basket is made from oak strips about 1/4" thick. The basket measures 43" from center of one side to center of the opposite side. Originally, the oak strips were nailed to the rim. Later, air guns were used to staple the strips to the rim. The true basket has seven strips instead of the five we will use.
We will use authentic construction methods-weaving and stapling. The use
of a stapler is not a normal construction technique in basketmaking, but it
is correct for this basket.
These instructions are written for someone who has never made a basket. Follow them carefully, taking care with measurements, and you will successfully complete this project. It will take about 1 hour.
Before beginning, please look at the picture of the tobacco basket.
Materials and tools:
- 10" square market handle with rounded corners
- 2 long strips of 1" flat reed
- pencil
- tape measure
- reed cutters or sharp scissors
- good quality stapler
- pan of water for soaking reed
- towel
Making the basket
- Place reed in water to soak.
- Measure each side of market handle and mark center point with pencil.
- Measure and cut 10 strips of reed, 13 1/2 inches long each. Notice that one side of reed is rougher than the other. The rough side will face up in the basket.
- Place the handle squarely in front of you. We will refer to the top of the handle as side A, the right side as B, the bottom as C, and the left side as D. Use center marks to place first strip of reed from center A to center C. Staple the reed to the rim, keeping the edge of the reed even with the top edge of the rim. Put the staple through the reed about 1/2" from top of rim (center the staple in the rim). You may need to use two staples to hold the reed securely.
- Look at the handle. Each side runs straight and then curves gently to form the corner. Attach a strip from A to C at the last straight point on the side. Repeat at the other corner, attaching a strip from A to C. Keep the edge of the reed even with the top edge of the handle.
- Checkpoint You now have 3 strips, parallel to each other, attached at the corners and mid-points of sides A and C. About 2" of handle separate the corner strip from the center strip.
- Center and staple a fourth strip between the corner strip and the center strip, leaving about 1/2 inch between the edge of the corner strip and the edge of the fourth strip and about 1/2 inch between the edge of the center strip and the edge of the fourth strip. Repeat with a fifth strip between the center strip and the other corner strip. Staple strips 4 and 5 from A to C.
- Checkpoint You now have 5 strips, parallel to each other, about 1/2 inch apart from each other, running from side A to side C.
- You will repeat steps 4 through 8, going from side B to side D and weaving the B-D strips over and under the A-C strips.
- Place the end of B-D center strip on top of the A-C center strip, then under the next strip and over the side strip, gently pulling it to the edge of the handle. Take the other end of the B-D center strip under then over the two A-C strips, gently pulling the end to the edge of the rim. Staple the ends of the new center strip at center marks on sides B and D.
- Follow this same weave pattern and staple 2 side strips B-D, 2" away from edges of center strip.
- Checkpoint Look at your basket. On two sides (A-C), you have 5 strips attached. On two sides (B-D) you have 3 strips attached, each going over-under-over-under-over the five strips.
- Attach the final two B-D strips, 1/2" from edges of center and side B-D strips. These two strips will reverse the weave and go under-over-under-over-under the five strips.
- Checkpoint The bottom of your basket now shows neat 1/2" square holes between the basket strips. The bottom is flat and the sides curve gently to the rim.
- Number your strips 1 through 5 on each side, beginning at the left and ending on the right. Cut four more strips of reed, 12 1/4" long each.
- You will now staple the new strips diagonally across the basket, smooth side of reed up, forming a diamond in the bottom of the basket. Staple one 12 1/4" strip from strip 2, side A (A-2) to strip 4 on side B (B-4). Repeat D-4 to C-4 (this strip will be parallel to strip A-2--B-4. Repeat for A-4 to D-2 and for B-2 to C-2. You will probably have to trim ends of the cross-pieces to fit evenly with the rim.
- Checkpoint The crosspieces from a diamond in the bottom of the basket. They are not woven--2 parallel strips lie on top of 2 other parallel strips. The diamond should be as flat as possible, each strip lying on the bottom of the basket.
- Beginning in the middle of one side, staple a strip of reed, smooth side facing out, all the way around the inside of the rim, covering the edges of the basket strips. Keep the top edge of the rim and the top edge of the reed even. Space the staples evenly, about the middle of the rim strip. Overlap the ends about 2 inches.
- Beginning in the middle of the opposite side, repeat on the outer edge of the rim. Keep the smooth side of the reed facing out.
Your basket is now finished. You may dye it in walnut dye or let it age naturally. This basket is a nice fruit bowl, a good frame for pictures or dried flowers, or a nice geometric pattern when hung on the wall.
Related article:
prev next
|
Site design, and webmastery by Cicada Consulting Group
Copyright © In Season Herbs and Basketsc 1997 All rights reserved. |
Page refreshed: Sat, Feb 23, 2002
http://www.inseason.com/baskets/maketobaccobasket.html |